Installing a CPU heatsink and fan is a critical task for anyone building or upgrading a computer. This guide will walk you through the essential steps to ensure your CPU stays cool and functions optimally. Proper installation of the heatsink and fan improves the thermal management of your CPU, potentially extending the lifespan of your system components.
Tools and Materials Needed
- Thermal paste
- Phillips head screwdriver
- Isopropyl alcohol and a lint-free cloth (for cleaning the CPU surface)
Steps to Install a CPU Heatsink and Fan
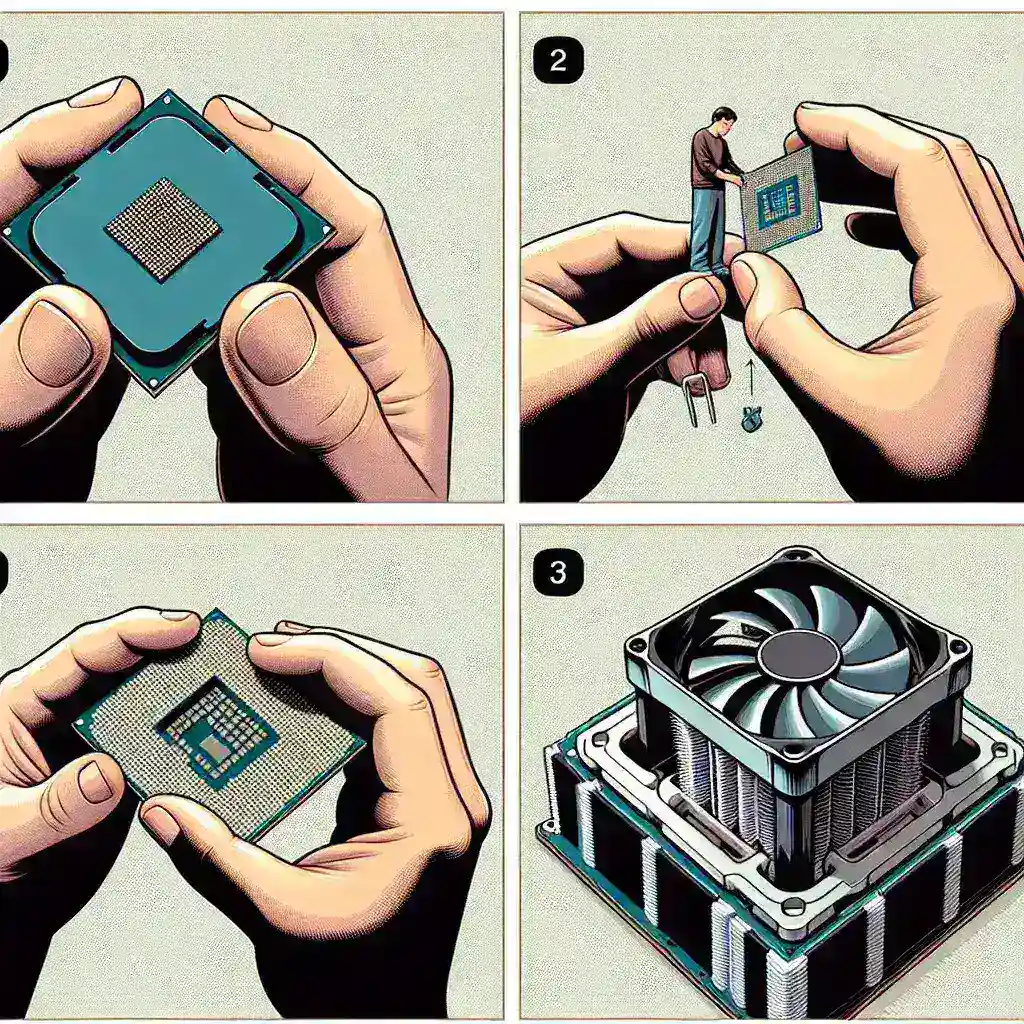
1. Power Down and Prepare
Before starting, ensure your computer is turned off and unplugged. If you’re installing in a new build, make sure the motherboard is securely placed in the case. For upgrades, remove any existing heatsink from the CPU.
2. Clean the CPU Surface
Using isopropyl alcohol and a lint-free cloth, gently clean the surface of the CPU to remove any old thermal paste or debris. This step is crucial for ensuring a good bond between the CPU and the new heatsink.
3. Apply Thermal Paste
Apply a small, pea-sized amount of thermal paste to the center of the CPU. This paste helps transfer heat from the CPU to the heatsink. Avoid applying too much, as it can reduce effectiveness and create a mess.
4. Position the Heatsink
Carefully place the heatsink onto the CPU, aligning it with the mounting holes on the motherboard. Be sure to refer to the manufacturer’s instructions, as some heatsinks have specific orientations.
5. Secure the Heatsink
Using the provided screws or clips, secure the heatsink onto the motherboard. Tighten the screws in a diagonal or criss-cross pattern to ensure even pressure distribution and proper contact with the CPU.
6. Attach the Fan
Most heatsinks come with an attached fan, but if it is separate, mount it to the heatsink according to the instructions. Ensure the fan is oriented to push or pull air in the desired direction.
7. Connect the Fan to the Motherboard
Locate the CPU fan header on the motherboard and connect the fan’s power cable to it. This header is usually labeled and situated near the CPU socket.
8. Check Everything Again
Double-check all connections and placements to ensure everything is secure and properly installed. Make sure there are no loose screws or cables that could interfere with the fan’s operation.
9. Power Up and Test
Plug your computer back in and power it on. Enter the BIOS/UEFI to monitor the CPU temperature and fan speed. Ensure the fan is spinning and the temperature remains within safe limits.
Troubleshooting Tips
- If the CPU temperature is higher than expected, recheck the thermal paste application and ensure the heatsink is tightly secured.
- If the fan is not spinning, verify the power cable is properly connected to the fan header.
- Consult the motherboard and heatsink manuals for additional troubleshooting steps if needed.
Conclusion
By following these steps, you’ll ensure your CPU heatsink and fan are installed correctly, leading to efficient cooling and optimal performance. Regular maintenance, such as cleaning dust from the heatsink and fan, will help sustain the cooling performance and extend the lifespan of your components.